
I am not sure which website this original article came from, and I do not have the original color images. If anyone has better images or a link to the original article, please email me the details.
Every Jeep is different and you will have to figure out a lot of this on your own. This is how I did mine and where I got some of the parts. I did this almost a year ago and I’m writing this from memory so if I jump around a lot I apologize. I’ll start in the front and work my way back
Steering box and mounting plate
You will need a Saginaw steering box and a chunk of flat plate big enough to make the mounting plate and a rag joint or Spicer series 1000 u-joint. The best place to find a cheap steering box is at a U-Pull it wrecking yard. Look for any 70 to 80 Buick Olds Pontiac. The bigger the car the better. Large cars have a slower turning rate. In a short wheel base vehicle the slower turning rate makes changing lanes on the freeway a lot more stable. Mine came out of an Olds Cutlass and is 3.5 turns lock to lock. Don’t just take the first one you find. Turn the steering wheel back and forth and check for play, check the power steering fluid and make sure it isn’t burnt. Look for a car that wasn’t abused.
They are out there. Some boxes have 3 mounting bolts and some have 4. The ones with 4 are stronger. You shouldn’t have to pay more than $30.00 for it. Now that I have the main parts I’ll start with the steering box plate…


First I cleaned up the frame horn. The factory boxing on the inside of the frame was welded in poorly, so I cut it out completely. The new plate that I was going to weld in would be a lot stronger than the old metal anyway. Hold the new steering box up to get an idea how big to make the plate. I have a lot of lift so I wanted the steering box down low to help make my drag link parallel to the tie rod and also so I could run the stock sheet metal over the top of the frame. I made a template with cardboard and extended it from the front of the frame all the way to the crossmember under the grill, It helps if you have somebody to help hold it together while you are mocking it up. Make sure you have enough room for the steering shaft from the column to go under or through the crossmember under the grill.
You have two options on attaching the steering shaft to the steering box. You can use a factory rag joint, or you can use Spicer 1000 series PTO u-joints. The Spicer u-joint is smaller in diameter than the box so if the box fits under the crossmember the u-joint will too. The factory rag joint is bigger in diameter than the box, so you have to mount the box lower, so the rag joint clears the crossmember.
Spicer makes a u-joint that fits the splines on the Saginaw box. I used the rag Joint on mine but if I had to do it over, I would use a Spicer u-joint. Just take the Saginaw box to a drive line shop and have them measure the splines. They measure shaft diameter and spline count. On one side of the u-joint it will fit the box, and the other side should be 3/4-inch keyed shaft. Cut out a rough plate and clamp it on your frame. Mark and drill all your holes before you weld it on. Welding should be the very last thing you do. You will have to make spacers to go between the box and plate. They are all different thicknesses. My advice is to use flat washers and after you get it where you want it measure and make spacers out of thick-walled tubing.
Steering shaft
Instead of trying to go through my motor mount I chose to go under it. This meant having to add an extra u-joint in the middle of the steering shaft and a support bearing to keep the shaft from flopping around. I used 3/4-inch diameter cold rolled steel for the shaft and I welded all the u-joints to it. If you don’t want to weld the joints on you can use a keyed shaft and set screws but you have to check them once in a while to make sure they don’t loosen up.


The support bearing is a “Fafnir PB 3/4” and is bolted to the bracket that I welded to the frame. I made the bracket so that I could drop the shaft out from the side if I needed to. On the steering box end I welded the shaft inside the tubing of the stock rag joint.
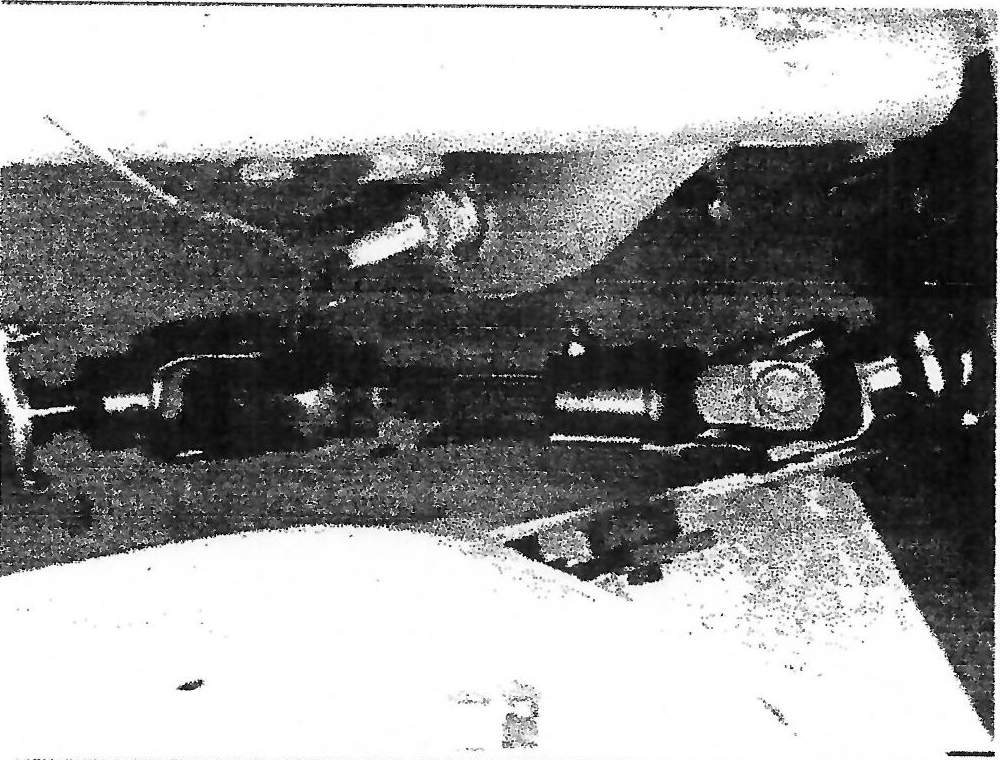

You have to have some kind of slip in your steering shaft between the solid mount on the frame and the column. If you don’t when the frame flexes it will push and pull on the column and tear up the bearings in it. I had a hard time figuring this one out until I found a Spicer u-joint with a 7/8 13 spline inside diameter. In the picture on the left, you see the u-joint next to the support bearing. The splined shaft is welded in on this side. The other side of the splined shaft can move in and out of the top u-joint. I have 3 inches of spline engagement in the top u-joint. To attach the u-joint to the column I had to make an adapter that bolted to the column with a 3/4-inch stub for the u-joint to attach to. I used 1/4-inch-thick plate and turned it in a lathe so it would be round. I drilled a 3/4-inch hole in the middle of it and the holes to bolt it to the stock Jeepster column. I welded up everything, so the adapter, stub shaft, and u-joint are one piece.
I hope this helps give you some ideas for your own Jeepster. It really wasn’t that hard, but it took a lot of hours. Most of which was running around town trying to find the parts I needed. I did learn a lot though. The Spicer u-joints came from a driveline shop. The splined shaft was from a farming supply store (It’s a PTO shaft coupler for a tractor). And the support bearing from an industrial bearing supply house. If you need them I have the numbers for the shops where I got the parts. Just drop me some email and I’ll send it to you.